Post Installation
Final steps
Output data
In Mod Organizer, move all output data mods and the output data separator, placing them last in the installation order.
Sorting and cleaning the new load order
Before moving on, sort the load order with LOOT. Take note of any plugins that LOOT reports as needing to be cleaned and perform the standard cleaning procedures on these mods. Ignore any reported missing compatibility patches. The guides patches take care of all the patching, thus eliminating the need for those additional plugins.
Run LOOT from MO
First time you run LOOT:
- Navigate to Landscape Fixes For Grass Mods.esp in the right pane. Use the filter if it is har to find.
- Press the three vertical dots after Landscape Fixes For Grass Mods.esp and choose to edit metadata.
- Click Load After
- Scroll to the bottom and click Add New Row. Enter Folkvangr - Grass and Landscape Overhaul.esp as value. This will force LOOT to sort Landscape Fixes For Grass Mods.esp after Folkvangr - Grass and Landscape Overhaul.esp. Click on the blue save button.
Sort the mod list by clicking on the Sort Plugins button.
Wait, click apply and exit.
Generating body and armor meshes
CBBE users need to build body and armor meshes using BodySlide following these instructions:
- Run BodySlide x64 through Mod Organizer
- In the Outfit/Body dropdown menu, choose CBBE NeverNude (this will also prevent NSFW images).
- In the preset menu, choose what suits you. The preset you choose should end with the word ‘outfit’. I recommended the presets Pear (outfit), Natural (outfit), CBBE Slim (outfit), UNP Natural (outfit), Thief (outfit) or Warrior (outfit).
- Tick the checkbox Build Morphs.
- Click the button Build to build the body.
- Click on the spyglass at the field Group filter and choose Choose groups.
- Check the following and click ok: Black Sacrament, CBBE vanilla outfits, Frankly HD, Lustmord, Scout Armor, WTF Wayfare Coat CBBE, unassigned.
- Click the button Batch build…
- Click build to build armor meshes.
- Make sure no physics options are checked. Check all Frankly options. Click ok and close BodySlide.
- Right click any mod in Mod Organizer 2 and choose All Mods/Refresh.
- Ensure the BodySlide_Output mod is active (checked).
Generating Animation Files
Once Nemesis is installed, the animation files need to be generated.
- Sort the load order with LOOT.
- Run Nemesis Unlimited Behaviour Engine via Mod Organizer 2.
- Check the boxes adjacent to Animated Armoury FPA and Archery Gameplay Overhaul.
- Click Update Engine and wait for the update to finish.
- Click Launch Nemesis Behaviour Engine and wait for the generation to finish indicated by the message Behaviour generation complete.
- Close Nemesis.
After closing Nemesis, there will be files in Overwrite:
- Double-click on Overwrite. A window will open.
- Drag the following folders and files from Overwrite to Nemesis_Output:
- meshes
- Nemesis_Engine
- scripts
- FNIS.esp
- Close the window.
- Ensure the Nemesis_Output mod is active (checked).
Nemesis may have generated a new plugin, FNIS.esp. Activate it and sort all plugins using LOOT.
Generating Unlimited Bookshelves patch
- Sort the load order with LOOT
- Run SSEEdit via Mod Organizer 2.
- Make sure all plugins are selected and click ok.
- A second window asking the user to select modgroups might show up. Simply click ok.
- Wait for SSEEdit to load. It may take a couple of minutes.
- Right-click in the tree view on the left side of the window. Choose Apply Script.
- Choose Unlimited Bookshelves Patch Generator and click ok.
- Anytime the script asks whether a file should be added as a master, click on yes".
- When the scipt is finished, close SSEEdit and make sure that the new patch is saved.
After closing SSEEdit, the patch will be in Overwrite:
- Double-click on Overwrite. A window will open.
- Drag the file UnlimitedBookshelvesPatch.esp from Overwrite to Unlimited_Bookshelves_Patch_Generator_Output.
- Close the window.
- Ensure the Unlimited_Bookshelves_Patch_Generator_Output mod is active (checked).
Precache grass
Users that installed No Grass In Objects with the precache options should precache their grass now:
- IN MO, click on the puzzle icon
- Choose Precache Grass and wait. This will start Skyrim, which will crash multiple times. This is normal. The process takes time, about 2 hours is normal.
- Move the grass files from the overwrite folder into their own mod folder.
Generating LOD files
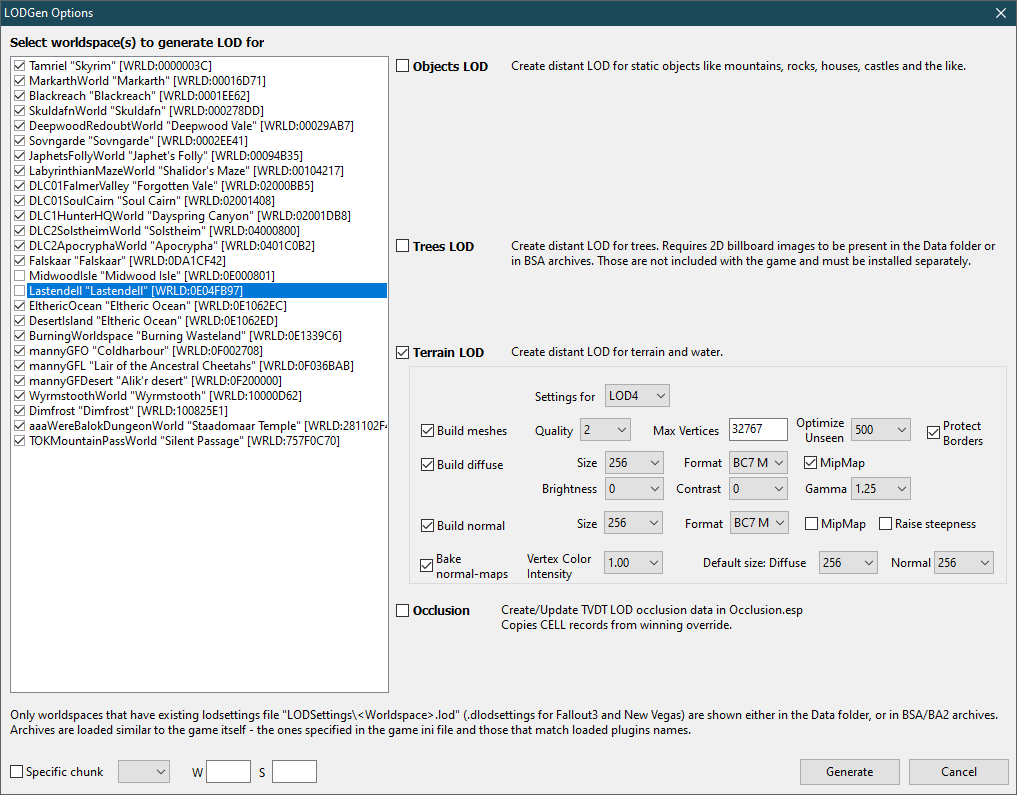
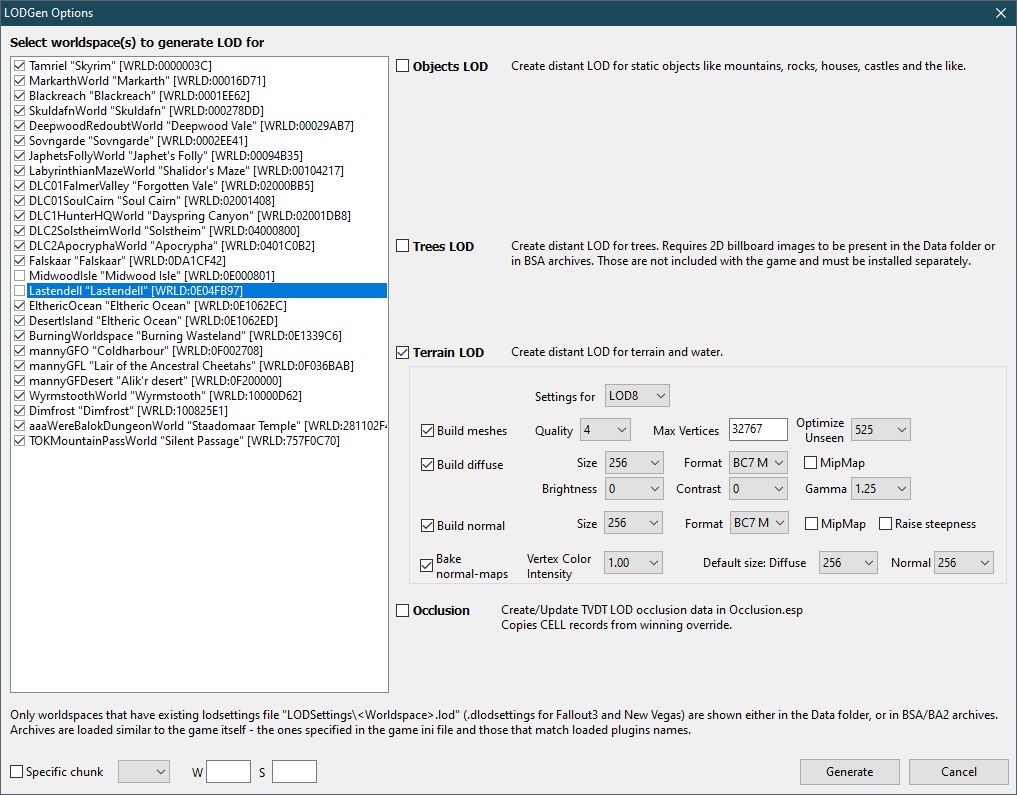
xLODGen - Terrain
Make sure that all LOD Generation texture mods are activated. Make sure that Cathedral Landscapes LODGEN Textures mod is activated and that the load order is sorted with LOOT.
Run xLODGen from the MO2 executable drop-down list.
Select all worldspaces except the Midwood Isle and Lastendell worldspaces.
Ensure that only the Terrain LOD box is checked in the right pane.
Use the following settings:
Click Generate to run the process. This will take ~50 minutes.
Once the LOD generation complete message has appeared, close xLODGen.

 .
.The generated files needs to be manually moved from the output folder. Cut and paste the files from the LOD generation output folder(… \Modding\Tools\xLODGen\xLODGen_Output) to the empty mod folder xLODGen_Output and activate it.
Deactivate the following mods:
- Cathedral landscapes LOD generation textures
- SSE-Terrain-Tamriel
Those running 4k resolution or higher should consider bumping up all texture sizes by doubling values shown (256 –> 512, 512 –> 1024).
Modify DynDOLOD INI
DunDOLOD is used to create LOD objects. It can create grass LODs, but at a quite huge performance cost. Creating grass LODs is not recommended for performance reasons.
Open the DynDOLOD_SSE.ini file located in ..\Modding\Tools\DynDOLOD\DynDOLOD\Edit Scripts\DynDOLOD
Make the following modifications:
Expert=1
Grass=0
GrassDensity=70
GrassLargeReference=1
DoubleSidedMeshMask=mountain,mtn
TerrainUnderside=1
If you use Cathedral Landscapes but not the other recommended grass mods, modify the following settings:
GrassBrightnessTopR=0.410
GrassBrightnessTopG=0.415
GrassBrightnessTopB=0.400
GrassBrightnessBottomR=0.200
GrassBrightnessBottomG=0.203
GrassBrightnessBottomB=0.195
If you use the mods in the section Models & Textures - Grass, modify the following settings.
GrassBrightnessTopR=0.600
GrassBrightnessTopG=0.645
GrassBrightnessTopB=0.650
GrassBrightnessBottomR=0.300
GrassBrightnessBottomG=0.323
GrassBrightnessBottomB=0.325
If you want grass LODs:
Grass=1
If you want grass LODs you also need to edit GrassControl.config.txt from No Grass in Objects, installed in the Extenders section. In GrassControl.config.txt, set
DynDOLODGrassMode = 2
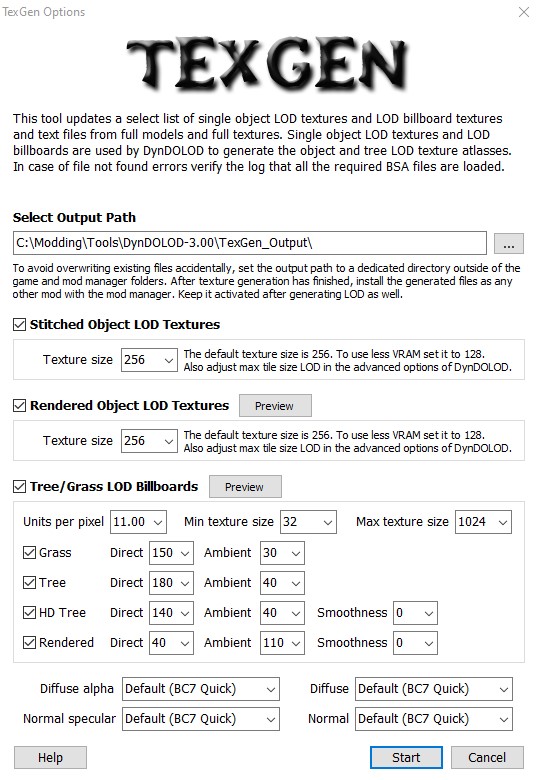
Run TextGen
Run TexGen from the MO2 executable drop-down list.
Check that the output location is correct. Change setting according to the pictures below.
Once the options has been chosen click Start. This will take ~20 minutes.
Once the completed message has appeared, click Save & Exit.
 .
. .
.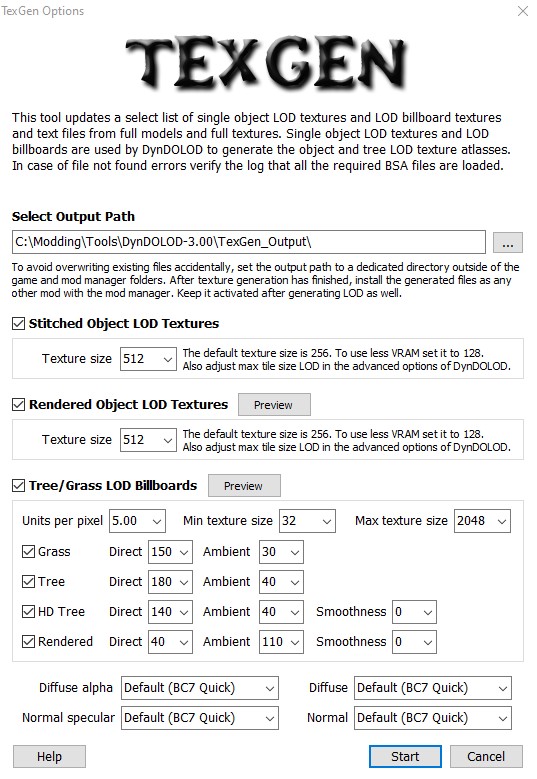 .
.If you are not generating grass LOD, be sure to untick Grass found under Tree/Grass LOD Billboards
The generated files needs to be manually moved from the output folder. Cut and paste the files from the Textgen output folder to the empty mod folder Textgen_Output and activate it.
Run DynDOLOD
- Run DynDOLOD from the MO2 executable drop-down list.
- Select all worldspaces except the Midwood Isle and Lastendell worldspaces.
- Ensure that the following options are ticked:
- Candles
- FXGlow
- Generate static LOD
- Create texture atlas
- Generate DynDOLOD
- Windows
- High
- Set Max tile size equal to the texture size used for TexGen previously.
- Click the High preset button
- Click OK to generate LOD’s. This takes ~40 minutes.
- Once the completed message has appeared, click Save & Exit.
The generated files needs to be manually moved from the output folder. Cut and paste the files from the DynDOLOD output folder to the empty mod folder DynDOLOD_Output and activate it.
- Ensure the DynDOLOD esm and esp files are checked in the right pane.
- Sort with LOOT.
- Ensure DynDOLOD.esp is the last plugin in the load order.
xLODGen - Occlusion
- Run xLODGen from the MO2 executable drop-down list.
- Select everything in Select Worldspace(s).
- Ensure only the Occlusion box is checked.
- Use the following settings:
- Quality: 3
- Height: 100
- Radius: 100
- Mode: -Flat +Borders
- Click Generate.
- Once the completed message has appeared, close xLODGen.
After closing xLODGen, the occlusion data will be in Overwrite:
- Double-click on Overwrite. A window will open.
- Drag the file Occlusion.esp from Overwrite to Occlusion_Data.
- Close the window.
- Ensure the Occlusion_Data mod is active (checked).